
Add an http-interceptor service in Angular to modify outgoing requests and handle incoming responses
In this blog, I will show you how you can add an http-interceptor service to your Angular project to intercept outgoing requests to simplify and make your http requests consistent, as well as intercept incoming responses to handle a 504 Gateway Timeout situation by retrying automatically.
As usual, you can find a fully working project on my GitHub
Angular Version: 9
What is an http-interceptor?
The job of an Angular’s HttpInterceptor is to intercept and handle an HttpRequest or an HttpResponse, allowing you to add code to do something. Some common use-cases are:
- Add a token or some custom HTTP header information prior to sending a request to the server
- Catch an HTTP response for data transformation
- Log all HTTP activity
- Detect a specific HTTP error response and take special action
In this blog we will intercept HTTP API server requests in our Angular project and add a token and server location information before passing through to the server. We will also interept HTTP responses to detect a 504 Gateway Timeout and retry 3 times, with a delay between each attempt before passing the 504 on.
Create new Angular Project
First, we will create an Angular project and add a simple HTTP service. Use ng new to create a project:
ng new http-interceptor
Go to the project directory and add a service:
ng g s data
Now, let’s add HTTP capability to our project. In app.module.ts import the HttpClientModule and add it to the imports array.
import { BrowserModule } from '@angular/platform-browser';
import { NgModule } from '@angular/core';

import { HttpClientModule } from '@angular/common/http';

import { AppComponent } from './app.component';

@NgModule({
  declarations: [
    AppComponent
  ],
  imports: [
    BrowserModule,
    HttpClientModule
  ],
  providers: [],
  bootstrap: [AppComponent]
})
export class AppModule { }
Then go to the new service, data.service.ts, and add HttpClient:
import { Injectable } from '@angular/core';
import { HttpClient } from '@angular/common/http';

@Injectable({
  providedIn: 'root'
})
export class DataService {

  constructor(private http: HttpClient) { }

}
Now we will add a method to call to a dummy service that simply sends back the response code we select, after a delay we configure. Add this method in `data.service.ts’:
getData(responseCode: number) {
  return this.http.get('http://httpstat.us/' + responseCode + '?sleep=1000');
}
OK. We have added HTTP capability to our project and an http get request method.
Now, let’s add a little code in app.component.ts to call the data service:
import { Component } from '@angular/core';

import { DataService } from './data.service';

@Component({
  selector: 'app-root',
  templateUrl: './app.component.html',
  styleUrls: ['./app.component.css']
})
export class AppComponent {
  showResult = false;
  httpResult: string;

  constructor(private data: DataService) {}

  onResponse(responseCode: number) {
    this.showResult = true;
    this.httpResult = 'Loading...';

    this.data.getData(responseCode)
    .subscribe(result => {
      this.httpResult = 'Success!';
    }, error => {
      this.httpResult  = 'Error! Status =' + error.code;
    });
  }
}
Here, we imported we imported our data service and created a method to call the getData method in the data service.
Great! Now all we need to do is add a little HTML to app.component.html, replacing the default HTML with this:
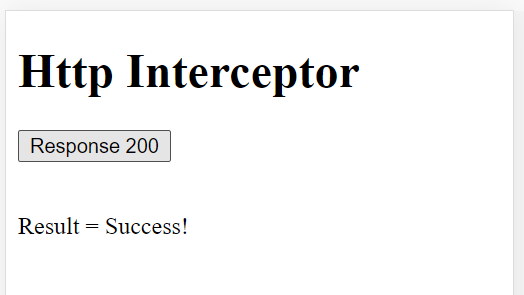
<h1>Http Interceptor</h1>

<button (click)="onResponse(200)" class="button">Response 200</button>

<p *ngIf="showResult">Result = </p>
When you run the app, you can make a call and get a ‘successful’ response:
Now we can add the http-interceptor service.
How to add http-interceptor to your Angular project
Add a new service to our Angular project:
ng g s http-interceptor
In http-interceptor.service.ts, import the Http services we need from @angular/common/http. Then add the HttpInterceptor interface to our class.
import { Injectable } from '@angular/core';
import {  HttpEvent,
          HttpInterceptor,
          HttpHandler,
          HttpRequest } from '@angular/common/http';

import { Observable } from 'rxjs';

@Injectable({
  providedIn: 'root'
})

export class HttpInterceptorService implements HttpInterceptor {
  intercept(request: HttpRequest<any>, next: HttpHandler): Observable<HttpEvent<any>> {
    console.log('request=', request.url);
    return next.handle(request);
  }
}
All we will do for now is log the request url and pass the request through using return next.handle(request).
Next we must tell Angular to use our interceptor service in `app.module.ts’:
import { BrowserModule } from '@angular/platform-browser';
import { NgModule } from '@angular/core';
import { HttpClientModule, HTTP_INTERCEPTORS } from '@angular/common/http';

import { AppComponent } from './app.component';
import { HttpInterceptorService } from './http-interceptor.service';

@NgModule({
  declarations: [
    AppComponent
  ],
  imports: [
    BrowserModule,
    HttpClientModule
  ],
  providers: [
    {
      provide: HTTP_INTERCEPTORS,
      useClass: HttpInterceptorService,
      multi: true
    },
  ],
  bootstrap: [AppComponent]
})
export class AppModule { }
We imported HTTP_INTERCEPTORS from @angular/common/http and instructed Angular to user our http interceptor service in the providers array.
Run the app again and call the service through the UI. Now we see our console.log message so we know our interceptor is working!

Intercepting incoming responses and handling a 504 Gateway Timeout response
You are problably already familiar with the 504 Gateway Timeout HTTP response if you’ve ever called an API before. A 504 Gateway Timeout Error indicates that a web server attempting to load a page for you did not get a timely response from another server from which it requested information.
In our app, we will simulate a 504 error by adding this code to `app.component.html’:
<button (click)="onResponse(504)" class="button">Response 504</button>
If we click our new button, we see in the console that we intercepted a 504 response.

So how do we retry the request?
Go to http-interceptor.service.ts, replace return next.handle(request) with the following code:
return next.handle(request).pipe(
  retryWhen(errors =>
    errors.pipe(
    )
  )
);
}
You will need to add the appropriate imports as well:
import { Injectable } from '@angular/core';
import {  HttpEvent,
          HttpInterceptor,
          HttpHandler,
          HttpRequest
        } from '@angular/common/http';

import { Observable } from 'rxjs';

import { retryWhen } from 'rxjs/operators';
Instead of passing through the response, we are intercepting it using the the pipe operator and, using the rxjs retryWhen operator, we’ve told Angular to retry ALL error responses.
Let’s see what happens if we run our app and click the 504 button:
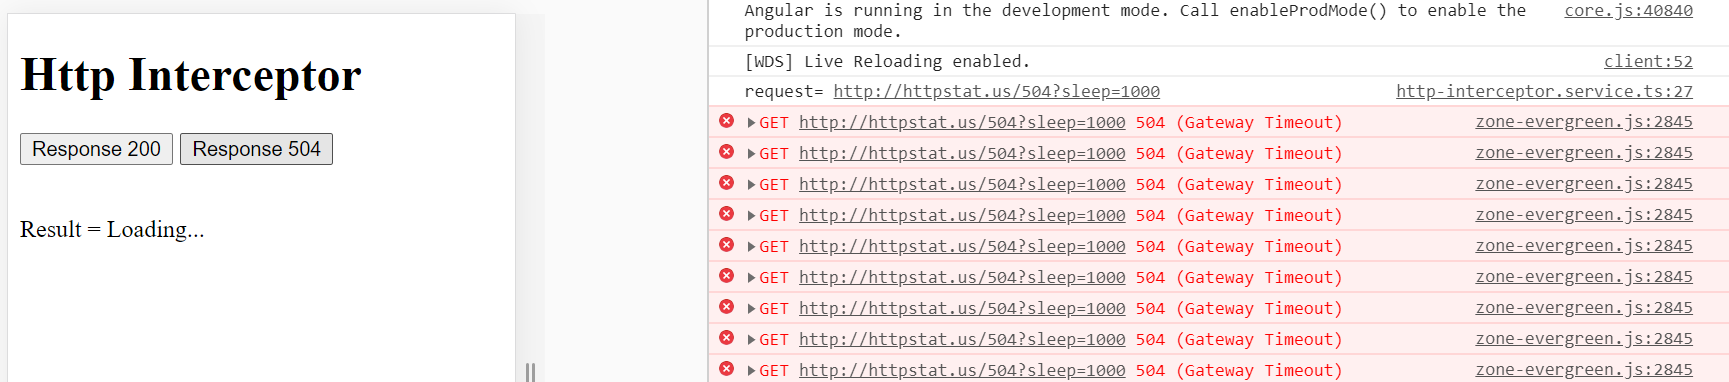
Well, we are retrying alright, but we’ve created an infinite loop that keeps retrying the request when it receives an error response. Let’s change that to only try 3 times and then fail, by adding the following code inside errors.pipe above.
concatMap((error, count) => {
  if (count < 3 && error.status === 504) {
    return of(error);
  }
  return throwError(error.error);
})
We use concatMap here because we want to make sure that we are doing things in sequence while waiting for completion. If the error is 504 and we haven’t yet retried 3 times, we retry. Otherwise, we thrown the error.
If we want to delay before re-trying, we can add the delay operator. Our intercept code now looks like this:
intercept(
  request: HttpRequest<any>,
  next: HttpHandler
): Observable<HttpEvent<any>> {
  console.log('request=', request.url);

  return next.handle(request).pipe(
    retryWhen(errors =>
      errors.pipe(
        concatMap((error, count) => {
          if (count < 3 && error.status === 504) {
            return of(error);
          }
          return throwError(error.error);
        }),
        delay(500)
      )
    )
  );
}
Now if we force the 504 error, it will retry 3 times with a 500 millisecond delay!

Intercepting outgoing requests and making your requests consistent
Another use case for the http-interceptor is to handle repetitive code in one place.
Let’s assume we are calling some backend API by adding the following code in data.service.ts:
getServerApi() {

  const requestOptions = {
    headers: new HttpHeaders({
      'Content-Type': 'application/json',
      Authorization: `Bearer ${this.getToken()}`
    })
  };

  return this.http.get(this.serverUrl, requestOptions);
}

private getHostLocation() {
  const hostLocation = window.location.host;

  let serverUrl = environment.serverUrl;

  if (environment.production && hostLocation.includes('localhost')) {
    // Override back-end URL with localhost if testing Service Worker using http-server
    serverUrl = 'http://localhost:3000';
  }

  return serverUrl;
}

private getToken(): string {
  const token = 'my-token';

  return token;
}
This would be fairly typical of a call to a back-end server where each call needs to get the server URL and an authorization token from local storage. Since this call isn’t real, I did not use local storage and there is no backend. I added another button to app.component.ts and some type script to call our backend server:
<button (click)="onApi()">Test API</button>
onApi() {
  this.showResult = true;
  this.httpResult = 'Loading...';

  this.data.getServerApi()
  .subscribe(result => {
    this.httpResult = 'Success!';
  }, error => {
    this.httpResult  = 'Error! Status =' + error.status;
  });
}
And just to show it is attemping the call, we see this CORS error we get when attempting to call a remote server that does not exist.

Now, imagine we had many API calls to this server across many different services. Each one would need to get the appropriate URL and token. That’s a lot of duplicate logic. Instead, we will intercept the request and add in the duplicate logic there in a single place.
In http-interceptor.service.ts, add this code before the response interceptor. Also move our getHostLocation() and getToken() methods as well:
console.log('request=', request.url);

let authReq: any;

if (request.url.startsWith('/api')) {
  authReq = request.clone({
    url: `${serverUrl}${request.url}`,
    headers: new HttpHeaders({
      'Content-Type': 'application/json',
      Authorization: `Bearer ${this.getToken()}`
    })
  });
} else {
    authReq = request;
}

private getHostLocation() {
  const hostLocation = window.location.host;

  let serverUrl = environment.serverUrl;

  if (environment.production && hostLocation.includes('localhost')) {
    // Override back-end URL with localhost if testing Service Worker using http-server
    serverUrl = 'http://localhost:3000';
  }

  return serverUrl;
}

private getToken(): string {
  let token = 'my-token';

  return token;
}
You will also need to change our response interceptor to take the new authReq variable like this return next.handle(authReq).pipe(.
For our backend, all of our API calls start with /api, so we can look for that and implement our logic while letting other requests through as is. The first thing we do is clone the request into a variable authReq. Then we get the appropriate server URL and append our request URL and add our headers with the token.
Now that we’ve moved this code here, we can change data.service.ts to this much simpler and cleaner call!
import { Injectable } from '@angular/core';
import { HttpClient } from '@angular/common/http';


@Injectable({
  providedIn: 'root'
})
export class DataService {

  constructor(private http: HttpClient) { }

  getData(responseCode: number) {
    return this.http.get('http://httpstat.us/' + responseCode + '?sleep=1000');
  }

  getServerApi() {
    return this.http.get('/api/get-orders');
  }
}
And that’s it! We try it out and get the same result as before, so we know it’s working!

As a reminder, you can find a fully working project on my GitHub
Feel free to contact me at dave@dev-reboot.com if you have any questions or comments.
Keep on developing!