
Use ng-content (content projection), ng-template, ngTemplateOutlet and ng-container for a reusable component in a real-world use case with nice example code
In this blog, I will define a use case where it makes sense to employ content projection using ng-content as well as ng-template with ngTemplateOutlet and ng-container. I will explain what these directives are and why we are using them.
As usual, you can find a fully working project on my GitHub
Angular Version: 9.1
Our requirements (use case)
As part of a web application for RV users, we have been given these requirements to create a reusable card component that will assure a consistent look-and-feel and branding for cards used throughout the application:
- Card must use our logo icon
![]()
- All cards must have the title “RV Like Me” with a consistent look and feel that is not configurable by the user of the reusable component.
- For phase one, the component should accept a card type of ‘lifestyle’ or ‘rig’ and this should be displayed nicely as a subtitle.
- The next area of the card should be an area for a picture, or multiple pictures, or really anything the user of the reusable component wants to put there.
- Next, should be a text area the user of the reusable component could fill with something like location or other meta information. For flexibility, the may configure the content and look-and-feel of this area.
- The next area should be a text area that the user of the reusable component may fill with something like a description. For flexibility, they may configure the content and look-and-feel of this area.
- There are two buttons under the description, LIKE and SHARE that are not configurable and should always have the same look and location on the card.
Here is an example of a card:

What is content projection and how can it help with our requirements?
Based on these requirements, it makes sense to pass a reference to the card type through an @Input decorator. But the rest of the requirements give much flexibility to the user of our component, which would make it difficult to use @Input. Instead we will allow the user to ‘project’ their HTML content into our component by using the ng-content directive!
The ng-content directive can be used as a placeholder in the target component to ‘project’ HTML from the parent component that is using the target component’s selector in it’s HTML. This makes it ideal for our requirements, where we want the user of our reusable component to be able to provide styled HTML content to our component. Let’s see how it works.
I created a component called content-projection and added Angular Material so we can use Material’s <mat-card> as our host container, as it provides the structure needed to support the requirement. In case you haven’t done this, here are the CLI commands.
ng new content-projection
ng install @angular/material @angular/cdk @angular/animations
ng add @angular/material
I also created a component called ‘card’ in our content-projection directory like this:
ng g c card
card will be our reusable card component. in card.component.html I added the following:
HTML
<mat-card>

  <mat-card-header>
    <mat-card-title>RV Like Me</mat-card-title>
    <mat-card-subtitle></mat-card-subtitle>
    <img mat-card-avatar src="./../../assets/images/logo.png">
  </mat-card-header>

  <ng-content select="[image]"></ng-content>

  <mat-card-content>
    <ng-content select="[location]"></ng-content>
    <ng-content select="[description]"></ng-content>
  </mat-card-content>

  <mat-card-actions>
    <button mat-button>LIKE</button>
    <button mat-button>SHARE</button>
  </mat-card-actions>

</mat-card>
CSS
mat-card {
  margin: 5px;
  max-width: 300px;
}

mat-card-header {
  margin-bottom: 10px;
}

mat-card-content {
  margin-top: 10px;
}

.main-image{
  width: 100%;
}
Typescript
import { Component, OnInit, Input } from '@angular/core';

enum CardType {
  lifestyle = 'Lifestyle',
  rig = 'Rig'
}

@Component({
  selector: 'app-card',
  templateUrl: './card.component.html',
  styleUrls: ['./card.component.css']
})
export class CardComponent implements OnInit {
  @Input() cardType: string;

  type: string;

  constructor() { }

  ngOnInit(): void {
    this.type = CardType[this.cardType];
  }

}
In <mat-card-header>, we use the title and logo provided in our requirements. We reference the cardType from the parent through the @Input decorator and apply it to an enum for consistency, displaying in the template in <mat-card-subtitle>. <mat-actions> implements the consistent ‘LIKE’ and ‘SHARE’ buttons.
Under <mat-card-header> we put the image using <ng-content select="[image]"></ng-content>. Note the use of the select property which references a variable called image in the parent component. This allows the parent component to specify the HTML to be projected into this specific area of the card. We use the same technique in <mat-card-content> to project the location and description HTML into the appropriate place in our card.
Let’s see how we would use our component. In app.component.html I added this:
<div>
    <app-card
      [cardType]="'lifestyle'">
      <img image style="width:100%" src="./../../assets/images/mccall-sunset.jpg">
      <p location>McCall, ID</p>
      <p description>This was the view from our RV park.  Beautiful here!</p>
    </app-card>
</div>
We pass the card type of ‘lifestyle’ through property binding. We use the image reference variable on the <img> tag to identify where we want to put the image in the card, as well as the location and description reference variables.
We try it out and it looks like the example in our requirements!
Now let’s make sure it has the flexibility we desire in our reusable component.
<div>
  <app-card
    [cardType]="'lifestyle'">
    <div image style="text-align:center">
      <a style="text-decoration:none; cursor:pointer;"
          href="./../../assets/images/mccall-sunset.jpg" target="_blank">
          <img style="width:32.3%; margin-right:1.03%" src="./../../assets/images/mccall-sunset.jpg">
      </a>

      <a style="text-decoration:none; cursor:pointer;"
          href="./../../assets/images/mccall-lake.jpg" target="_blank">
          <img style="width:32.3%; margin-left:1.03%" src="./../../assets/images/mccall-lake.jpg">
      </a>

      <a style="text-decoration:none; cursor:pointer;"
          href="./../../assets/images/mccall-snow.jpg" target="_blank">
          <img style="width:32.3%; margin-left:1.03%" src="./../../assets/images/mccall-snow.jpg">
      </a>
    </div>
    <p location>
      Plan your visit to
      <a href="https://visitmccall.org" class="hyperlink" target="_blank">McCall, ID</a>
      !
    </p>
    <div description>
      <p>Things to see in McCall, ID</p>
      <ul>
        <li>Payette Lake</li>
        <li>Ponderosa State Park</li>
        <li>Central Idaho Historical Museum</li>
      </ul>
    </div>
  </app-card>
</div>
Instead of a single image, we’re passing in 3 smaller images that are clickable to enlarge. The text for location contains an external link and the description is now a list.
One important thing to point out is that the styles are coming from the parent. I’ve used both in-line styles and a style class in the app.component.
Let’s see what this looks like now:

Great! We’ve given the user the flexibility to change the content as they see fit, while maintaining consistancy and branding!
Now, how can we make this code more efficient? ng-template and ng-container!
ng-template
ng-template allows you to wrap some HTML that will not be included in the DOM unless you apply a structural directive like *ngIf.
This code will show nothing. It is just holding the template:
<ng-template>
  <p>the text here will not be seen in the DOM</p>
</ng-template>
But this template will be seen in the DOM provided showText evaluates to true:
<ng-template *ngIf="showText">
  <p>the text here will not be seen in the DOM</p>
</ng-template>
ng-template itself will not show in the DOM but if you had used a div instead, the div would show. So, it helps you optimize your HTML.
I will use ng-template in our code to hold the ‘single image’ and ‘multi-image’ examples we saw above and alternate them based on a random number generator. First, we will use div and then we will try ng-template and see the difference in the DOM.
HTML
<div [ngSwitch]="cardType">

  <div *ngSwitchCase="'single'">
      <app-card
        [cardType]="'lifestyle'">
        <img image style="width:100%" src="./../../assets/images/mccall-sunset.jpg">
        <p location>McCall, ID</p>
        <p description>This was the view from our RV park.  Beautiful here!</p>
      </app-card>
  </div>

  <div #multi>
    <app-card
      [cardType]="'lifestyle'">
      <div image style="text-align:center">
        <a style="text-decoration:none; cursor:pointer;"
            href="./../../assets/images/mccall-sunset.jpg" target="_blank">
            <img style="width:32.3%; margin-right:1.03%" src="./../../assets/images/mccall-sunset.jpg">
        </a>

        <a style="text-decoration:none; cursor:pointer;"
            href="./../../assets/images/mccall-lake.jpg" target="_blank">
            <img style="width:32.3%; margin-left:1.03%" src="./../../assets/images/mccall-lake.jpg">
        </a>

        <a style="text-decoration:none; cursor:pointer;"
            href="./../../assets/images/mccall-snow.jpg" target="_blank">
            <img style="width:32.3%; margin-left:1.03%" src="./../../assets/images/mccall-snow.jpg">
        </a>
      </div>
      <p location>
        Plan your visit to
        <a href="https://visitmccall.org" class="hyperlink" target="_blank">McCall, ID</a>
        !
      </p>
      <div description>
        <p>Things to see in McCall, ID</p>
        <ul>
          <li>Payette Lake</li>
          <li>Ponderosa State Park</li>
          <li>Central Idaho Historical Museum</li>
        </ul>
      </div>
    </app-card>
  </div>

  <div *ngSwitchDefault>
    <p>I see nothing</p>
  </div>

</div>
Typescript
enum CardType {
  'single' = 1,
  'multi' = 2
}

cardType: string;

ngOnInit(): void {
  const cardNbr = Math.floor(Math.random() * 2) + 1;
  this.cardType = CardType[cardNbr];
}
What does this look like in the DOM? Using Chrome’s development tools we can inspect the source code and see all of the divs we are using:

Now, we will try the ng-template directive, replacing the divs around our two <app-card> selectors:
<div [ngSwitch]="cardType">

  <ng-template [ngSwitchCase]="'single'">
      <app-card
        [cardType]="'lifestyle'">
        <img image style="width:100%" src="./../../assets/images/mccall-sunset.jpg">
        <p location>McCall, ID</p>
        <p description>This was the view from our RV park.  Beautiful here!</p>
      </app-card>
  </ng-template>

  <ng-template [ngSwitchCase]="'multi'">
    <app-card
      [cardType]="'lifestyle'">
      <div image style="text-align:center">
        <a style="text-decoration:none; cursor:pointer;"
            href="./../../assets/images/mccall-sunset.jpg" target="_blank">
            <img style="width:32.3%; margin-right:1.03%" src="./../../assets/images/mccall-sunset.jpg">
        </a>

        <a style="text-decoration:none; cursor:pointer;"
            href="./../../assets/images/mccall-lake.jpg" target="_blank">
            <img style="width:32.3%; margin-left:1.03%" src="./../../assets/images/mccall-lake.jpg">
        </a>

        <a style="text-decoration:none; cursor:pointer;"
            href="./../../assets/images/mccall-snow.jpg" target="_blank">
            <img style="width:32.3%; margin-left:1.03%" src="./../../assets/images/mccall-snow.jpg">
        </a>
      </div>
      <p location>
        Plan your visit to
        <a href="https://visitmccall.org" class="hyperlink" target="_blank">McCall, ID</a>
        !
      </p>
      <div description>
        <p>Things to see in McCall, ID</p>
        <ul>
          <li>Payette Lake</li>
          <li>Ponderosa State Park</li>
          <li>Central Idaho Historical Museum</li>
        </ul>
      </div>
    </app-card>
  </ng-template>

  <ng-template *ngSwitchDefault>
    <p>I see nothing</p>
  </ng-template>

</div>
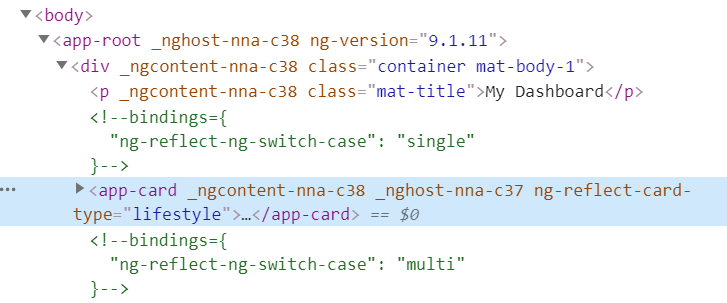
Now let’s look at the DOM again. Two of the divs are gone. The only one remaining is the wrapper for the parent component.
ng-container and ng-templateOutlet
We can also avoid another unnecessary div, which is holding our ngSwitch, by replacing with ng-container.
The ng-container directive provides us with an element that we can attach a structural directive to without having to create an extra element in the DOM.
We could simplify further using ngTemplateOutlet to reference the appropriate templates. This makes for cleaner code.
<ng-container [ngSwitch]="cardType">

  <ng-container *ngSwitchCase="'single'">
    <ng-container *ngTemplateOutlet="single"></ng-container>
  </ng-container>

  <ng-container *ngSwitchCase="'multi'">
    <ng-container *ngTemplateOutlet="multi"></ng-container>
  </ng-container>

  <ng-container *ngSwitchDefault>
    <ng-container *ngTemplateOutlet="default"></ng-container>
  </ng-container>

</ng-container>

<ng-template #single>
  <app-card
    [cardType]="'lifestyle'">
    <img image style="width:100%" src="./../../assets/images/mccall-sunset.jpg">
    <p location>McCall, ID</p>
    <p description>This was the view from our RV park.  Beautiful here!</p>
  </app-card>
</ng-template>

<ng-template #multi>
  <app-card
    [cardType]="'lifestyle'">
    <div image style="text-align:center">
      <a style="text-decoration:none; cursor:pointer;"
          href="./../../assets/images/mccall-sunset.jpg" target="_blank">
          <img style="width:32.3%; margin-right:1.03%" src="./../../assets/images/mccall-sunset.jpg">
      </a>

      <a style="text-decoration:none; cursor:pointer;"
          href="./../../assets/images/mccall-lake.jpg" target="_blank">
          <img style="width:32.3%; margin-left:1.03%" src="./../../assets/images/mccall-lake.jpg">
      </a>

      <a style="text-decoration:none; cursor:pointer;"
          href="./../../assets/images/mccall-snow.jpg" target="_blank">
          <img style="width:32.3%; margin-left:1.03%" src="./../../assets/images/mccall-snow.jpg">
      </a>
    </div>
    <p location>
      Plan your visit to
      <a href="https://visitmccall.org" class="hyperlink" target="_blank">McCall, ID</a>
      !
    </p>
    <div description>
      <p>Things to see in McCall, ID</p>
      <ul>
        <li>Payette Lake</li>
        <li>Ponderosa State Park</li>
        <li>Central Idaho Historical Museum</li>
      </ul>
    </div>
  </app-card>
</ng-template>
We can see here that there is no div clutter at all. Just our container to host the child component!

On a side note, if you want to apply two structural directives to an element, you could wrap the element in ng-container and apply one there, as Angular does not allow two structural directives on one element.
Conclusion
Hopefully, by using a real-world use case, you can see how to use ng-content for projection of HTML from a parent template to a child template and how to use ng-template with ngTemplateOutlet to store and switch between HTML and ng-container to host structural directives without DOM impact.
As a reminder, you can find a fully working project on my GitHub.
Feel free to contact me at dave@dev-reboot.com if you have any questions or comments.
Keep on developing!